this CI/CD guide will make it easier to go live from your GitHub repository to your webhost leveraging SSH keys and automated GitHub Actions with built-in security

ah, the good ol' days of webdesign, when all it took was a few images, some HTML tables, a Geocities account and an FTP connection to own a piece of virtual estate.
nowadays however, with tech making everything easier, it's not that simple anymore.
last year I chose to move from Hostgator to Hostinger after 15+ years of service — we're not old, we're classic — and the main thing I was looking for was a more future-proof way to go about publishing my website(s).
so while life was happening, I took my time to look up how best to leverage GitHub and Hostinger and build a simple CI/CD pipeline to update code locally, push it, and have the changes delivered, no muss no fuss, to my website.
and now you'll be able to follow along and get a similar result for yourself! although this approach was put together with the aforementioned services in mind, with a little bit of tinkering you should be able to make it work with any combination of web hosting plan and developer platform you choose — provided you can SSH into your web host and run Terminal commands.
so without further ado, let's roll up our sleeves and get busy!
1. generate SSH Key in Hostinger
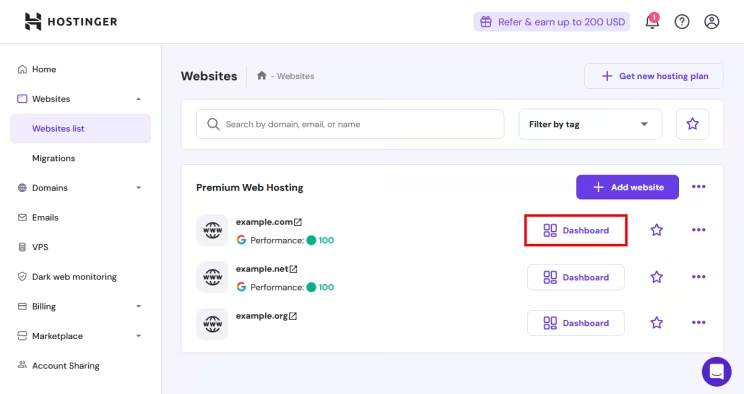
on the Main menu, under Websites list, click on Dashboard to the right of the desired domain.
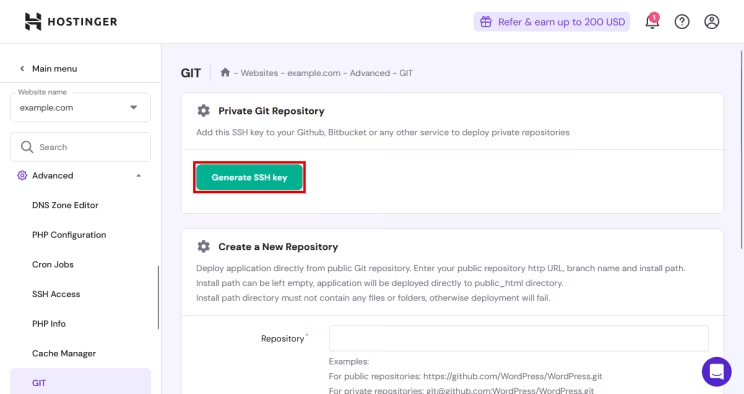
then go to Advanced > GIT and click on Generate SSH key. this is good for any Hostinger deployment, regardless of repository.

2. add the public Hostinger SSH Key to GitHub

on GitHub, click on your profile pic then go to Settings > SSH and GPG keys.

click on New SSH key, paste the contents of the public key generated in Hostinger, and save it as HOSTINGER_SSH_PUBLIC.
3. retrieve the Hostinger server's SSH host key
on Terminal, run:
$ ssh-keyscan -H -p your_hostinger_port your_hostinger_server_ip_or_domainyou can fetch that info from the following screen:

it will come in handy later on, so write it down (and don't share with anyone).
that kind of information should not be hardcoded in your repository as it could be a major security risk. instead, save it as GitHub Secrets by going to the Settings tab of your repo and clicking on Secrets and variables > Actions > New repository secret.
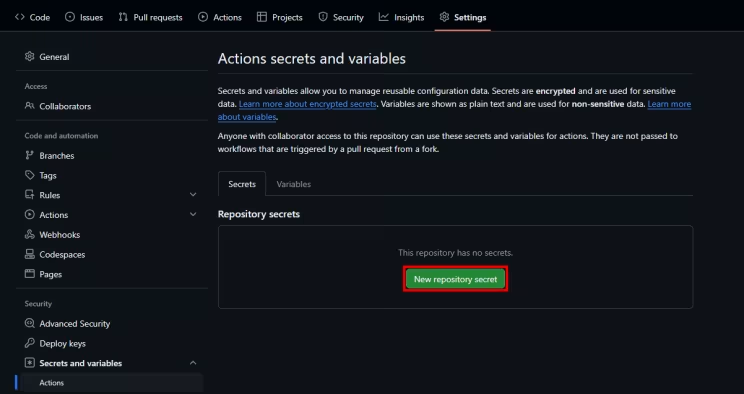
add the host key you generated with ssh-keyscan to your GitHub repository secrets as HOSTINGER_KNOWN_HOST_KEY. also set up GitHub Secrets for HOSTINGER_PORT, HOSTINGER_USERNAME, and HOSTINGER_HOST.
when you set up the GitHub Secret for HOSTINGER_PASSWORD, keep in mind that's the same as your SSH password, not your account password.
a friend of a friend spent a few hours scratching his head beacause of this difference.
4. encode a private key and add it to GitHub Secrets
on terminal, SSH into Hostinger and execute:
$ ssh-keygen -t rsa -b 4096 -C "github-to-hostinger-deploy" -f github-to-hostinger
cat github-to-hostinger | base64 -w0
add the resulting key to GitHub Secrets as HOSTINGER_SSH_PRIVATE_ENCODED.
create a new file in your repo called hostinger.yml under .github/workflows/:
name: Deploy to Hostinger via SSH

on:
  push:
    branches:
      - master

jobs:
  deploy:
    runs-on: ubuntu-latest
    steps:
    - name: Checkout repository
      uses: actions/checkout@v4
      with:
        fetch-depth: 0
        show-progress: true

    - name: Log job start
      run: echo "Starting job..."

    - name: Deploy via SSH
      uses: appleboy/ssh-action@master
      with:
        host: ${{ secrets.HOSTINGER_IP }}
        username: ${{ secrets.HOSTINGER_USERNAME }}
        password: ${{ secrets.HOSTINGER_PASSWORD }}
        key: ${{ secrets.HOSTINGER_SSH_PRIVATE_ENCODED }}
        port: ${{ secrets.HOSTINGER_PORT }}
        script: |
          # Add the manually verified host key to known_hosts
          echo "${{ secrets.HOSTINGER_KNOWN_HOST_KEY }}" >> ~/.ssh/known_hosts

          # Check if the directory is a Git repository
          if [ ! -d "/home/your_username/domains/example.com/public_html/.git" ]; then
            # If not, initialize it
            cd /home/your_username/domains/example.com/public_html/
            git init
            git remote add origin git@github.com:LucolesLTDA/luco_net_br.git
          else
            # If it is, just change to the directory
            cd /home/your_username/domains/example.com/public_html/
          fi

          # Automatically accept GitHub's host key
          ssh-keyscan -H github.com >> ~/.ssh/known_hosts

          # Pull latest changes on master branch
          git pull origin master

          # Install
          composer2 install

    - name: Log job completion
      run: echo "Job's done!"
this script will:
- only work on the master branch when changes are pushed
- instantiate a container to carry out the deployment
- log the beginning of activities
- ensure connection happens without any issues
- check for the existence of a Git repo in Hostinger
- initialize Git if needed
- connect Hostinger to GitHub
- pull the changes
- (re)install the codebase with Composer, version 2
- then finally log a successful execution. hooray \o/
don't forget to make the necessary adjustments in the script to reflect your server setup. commit and push this workflow to your GitHub repo, then re-run the job from GitHub Actions. you'll see the commit message as the workflow run title.

the first line of your script (Deploy to Hostinger via SSH) is what you're looking for in this screen. underneath that line are all the deployment jobs. click on any workflow run from the list, then click on Re-run all jobs.
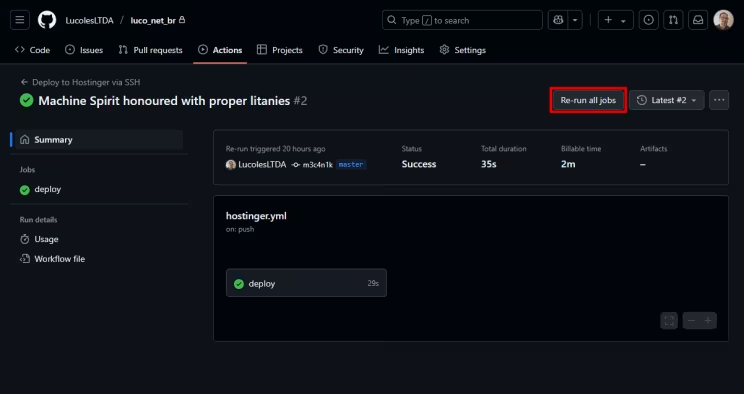
the first time you commit your script, it will trigger a deployment, so there will always be at least an item in this list. once that's finished, head back to Hostinger and check if the files were deployed correctly.
wrapping up
if you followed all the steps in this tutorial, your CI/CD pipeline should be working now. if you have any questions, don't hesitate to reach out to me. thanks for reading and until next time!
Originally published at https://linkedin.com on April 8, 2025.